Search This Blog

Friday, April 10, 2009

High-Key B&W Portrait Effect

Our tutorial this time will show you how you can achieve high-key effect in a Black and White portrait with only 4 easy steps in photoshop.

Here are our before and after portraits..

high key technique

Step 1.) Desaturate your portrait with image>adjustment>desaturate or simply by pressing shift+ctrl+u

high key technique

Step 2.) Apply image adjustment curve to your portrait

high key technique

Step 3.) Duplicate the layer, and add gaussian blur (Filter > Blur > Gaussian Blur), change the layer blend mode to overlay

high key technique

Step 4.) Add layer mask, Set your foreground color to black, and start brushing over the eyes, nose, and lips. You might want to use the burn tool to burn the background layer around the eyes, nose, and lips.

high key technique

Making Own Poster

lways wanted to play Al Pacino in the classic hitmovie "Scarface"? Well here's your chance to at least have your photo on the movieposter!

We will replicate the black and white poster, with this image as a rough sample (There must be better images of this poster available, but this one will do for now..)

Take a good photo of yourself and open it in photoshop.

Remove the background by using either the Polygonal or Magnetic Lasso Tool.

Once done we will convert your image to pure black and white. Now I am sure there are easier ways to do this, but I used the Cutout effect, to have more control.

Filter -> Artistic -> Cutout

Set the number of levels to 2, keeping the other 2 settings in their original position, press OK

Now your image has a vectorized look, but needs to be set to black and white. I used the magic wand tool to do this piece by piece, to avoid big black areas, with no detail whatsoever. Select the magic wand tool (press W) and set the tolerance at the top to a level around 50.

Hit D and then X to set the background colour to black. (Hit X again to set it to white again).

Start selecting areas and give them a colour to your liking. In general this goes pretty quick, especially if you untick Contiguous at the top. (This means that areas with the same colour will be selected, they dont have to be connected).

Once done you should have a black and white picture of yourself! If you're image looks to the left, go to Image -> Rotate Canvas -> Flip canvas horizontally to make it look to the right! This will look better in the end. If your image just stares at you, thats fine as well smile.gif

Now, we will add the black partial background. Add a new layer and select the Polygonal lasso tool. Make a selection that covers the left part of the image, and spare some of the details of the image. so that means you will go down via the left side of the image, as you can see below:


Easy huh?! Now all thats left is the text and we're done! As you can see I have some blank space on my canvas available. If you have a shortage of space, simply increase the canvas size!

Image -> Canvas size

My best guess was Times New Roman for the font, ofcourse you may experiment with this yourself, but if you stretch it a little it comes pretty close I think.

First we'll start with the red text.

Type "AL PACINO SCARFACE". Select a font size so that it covers the width of your screen!

My settings:


Al pacino should be in the black part of the image, scarface in the right. Add some spaces when necessary.

On the left side there will appear the following text. Copy it to save yourself some typing bigwink.gif

CODE
He was
Tony Montana.

The world
will remember
him by another
name

...SCARFACE


With the following settings:


At the total bottom of the original poster, you can also see the text:

CODE
He loved the American Dream.
With a vengeance.


Add it if you have the space available, I didnt, so I just left it out. Use a smaller font size, but set it to bold.

On the right, there will be room for the movie credits, again, copy + paste:

CODE
A MARTIN BREGMAN
PRODUCTION
A BRIAN DE PALMA
FILM
AL PACINO "SCARFACE"
SCREENPLAY BY
OLIVER STONE
MUSIC BY
GIORGIO MORODER
DIRECTION OF PHOTOGRAPHY
JOHN A. ALONZO
A.H.C.
EXECUTIVE PRODUCER
LOUIS A. STROLLER
PRODUCED BY
MARTIN BREGMAN
DIRECTED BY
BRIAN DE PALMA


Set it to align-right.

Use these settings:

for the names (only the name itself): font size: 27pt, vertically scale 125%
for the 'a' in front of the name: font size: 9pt, vertically scale 125%
for the 'E' in 'A BRIAN DE PALMA': font size: 22pt, vertically scale 125% (twice)
for the remaining text: font size: 9pt, vertically scale 100%

you should have an end result close to this:

Photoshop Icon Tutorial

Vista Error Icon

Vista Error Icon

Posted In : Graphic Design

In this Photoshop tutorial I'll show you how to create Windows Vista icons using a few basic layers, creative layer styles and some web 2.0 gradients.

In this Photoshop tutorial I’ll show you how to create Windows Vista icons using a few basic layers, creative layer styles and some web 2.0 gradients.

I’ve had a few requests for icons like this, so here you go folks!

Step 1

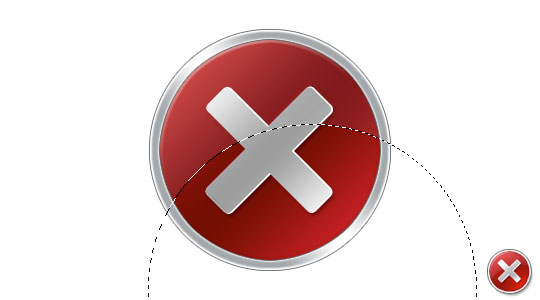
Lets first take a look at a few Vista icons. The icon we’ll be working towards is the Error icon on the left, however by simply changing the color in the Layer Style you’ll be able to easily adapt this icon to many others and perhaps even come up with some on your own.

Step 2

If I were actually going to be creating an icon for either Windows Vista or Mac OSX I’d be starting with a document size of 256×256 with a transparent background, so if you actually want to turn your file into a usable icon I’d suggest starting with that document size. Since this is just an illustration of technique, I’m going to use my standard 540×300 tutorial image size. I’ll also drag my example error icon down to the corner of the stage so I can refer to it as I work. Using reference is always recommended when you’re trying to mimic an object that already exists.

Lets get started by creating a new layer by clicking on the Create New Layer icon at the bottom of the layers palette. As always, I suggest you name your layers upon creating them and I’m going to call this one Border.

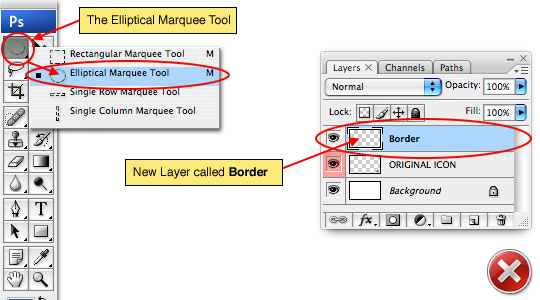
Press the M key to invoke the Marquee tool and choose the Elliptical Marquee tool from the fly-out menu in the tools bar (since we’ll be creating a circular icon).

Step 3

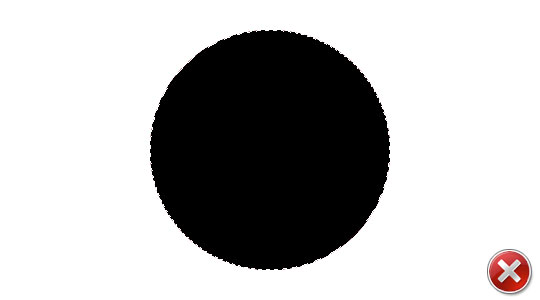
Holding the Shift key to constrain our selection to a perfect circle, click and drag a nice size round selection. If you are creating an icon in the 256×256 file size, you’ll probably want to use up nearly all of that space with your circle so lets make our selection 240×240 pixels. If you want to be exact here you can either watch the Info palette (accessed by choosing Window>Info from the main menu) or you can use the Fixed Size style option that appears in the Options bar at the top of Photoshop when the Marquee tool is selected.

(*note: As a side note, you can switch between the Rectangular Marquee and the Elliptical Marquee tool once you’ve got the tool selected is by pressing Shift-M.)

Press the D key to set the foreground color to black and then fill the selection by pressing Option-Delete (PC: Alt-Backspace).

Step 4

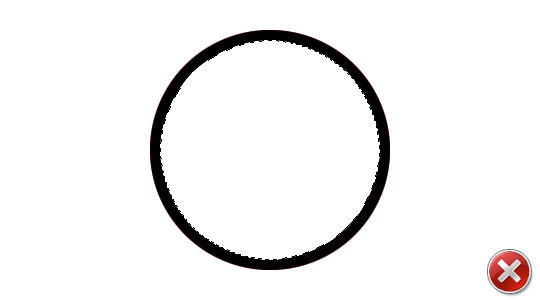
Now that we’ve got the selection filled, we want to shrink the selection and delete the middle leaving only the outer ring as the border for our icon. From the main menu choose Select>Modify>Contract which will bring up a dialog asking how many pixels you wish to contract the selection by, set the size to 10 pixels and click OK. Now just press Delete (PC: Backspace) to remove the black inside the newly reduced selection.

I know you’ll have the overwhelming urge to release your selection right now… but don’t do it!

Step 5

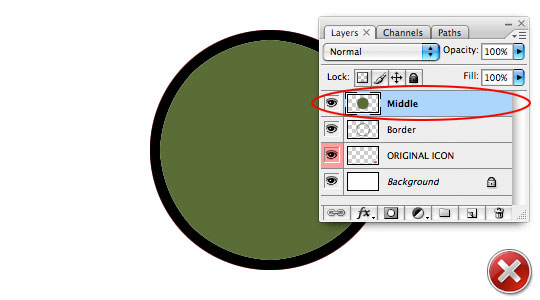
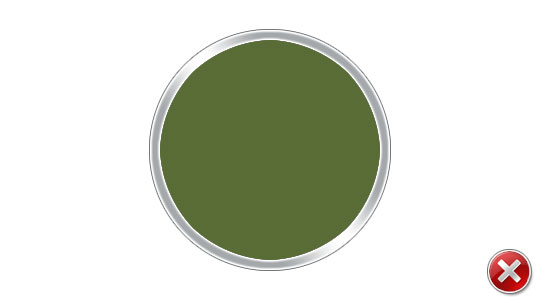
Before releasing the selection lets create a new layer called Middle and with the new layer selected fill the selection with a different color, any color will be fine so pick something you like, maybe something that looks like split pea soup.

Now it’s ok to press Command-D (PC: Ctrl-D) to release the selection.

Step 6

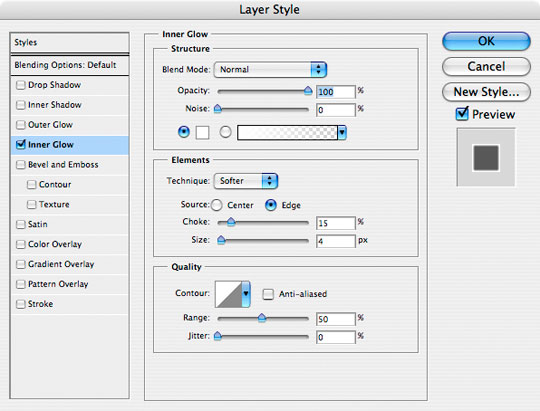
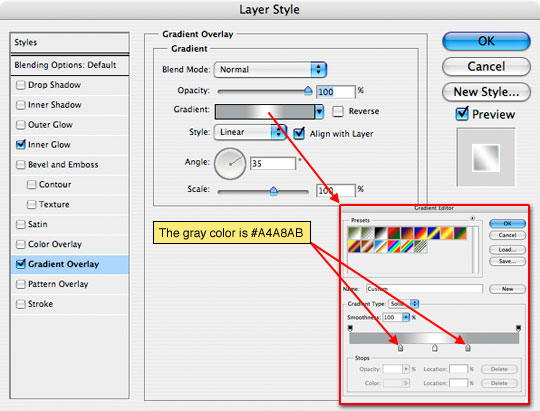
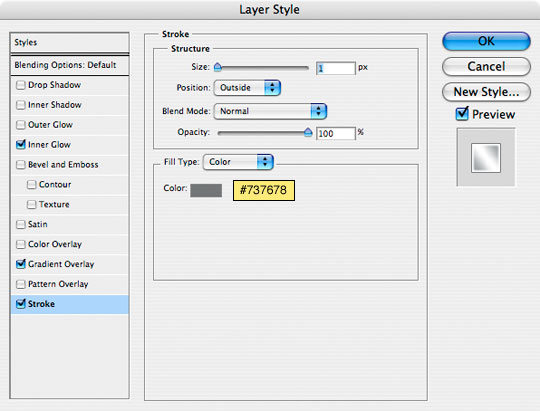
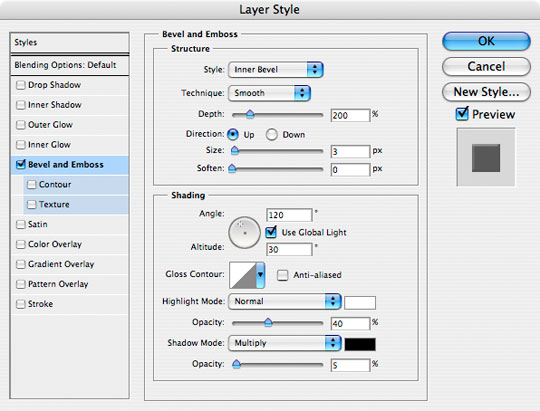
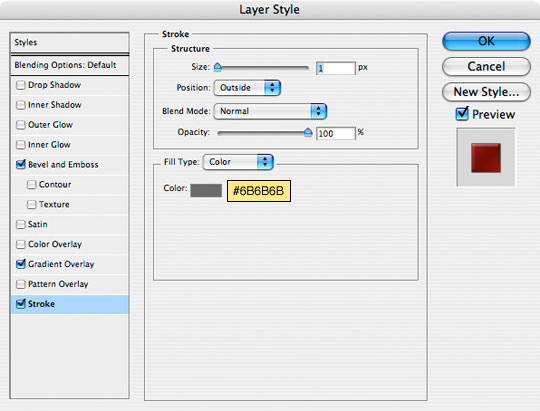
Now we’re ready to start adding some layer styles. Click back to the Border layer to make it the active working layer and by Control-Clicking (PC: Right-Clicking) on the layer choose Blending Options from the menu to bring up the Layer Styles window. Using layer styles we are going to create the nice reflective chrome effect for the border on our icon.

(*note: You can also bring up the Layer Styles window by simply double clicking to the right of the layers name in the Layers palette.)

Add the following 3 layer styles and click OK. Be careful to check each setting here.


Step 7

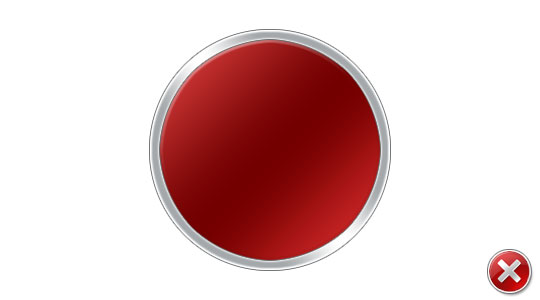
This is where you should be so far. If you’re having a hard time following along with the layer styles dialogues feel free to jump to the end of the tutorial and download the .PSD lesson file so you can follow along as we go. By double clicking on the layer style icon in each of my layers you can bring the Layer Styles dialog box for that layer back up and see every setting for yourself.

Step 8

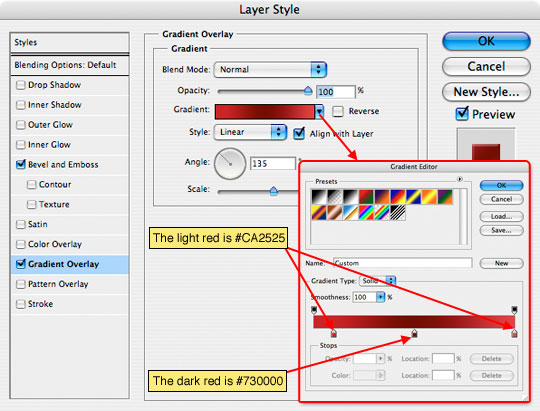
Ok, now lets click up to the Middle layer in the layers palette and give it a few Layer Styles of it’s own. Just like you did back in Step 6, open the Layer Styles window for this layer and apply the following styles.

Notice in the Gradient Overlay area we choose some nice red tones that completely mask the lovely split pea soup green we had going on before (this is why I said color doesn’t matter). Because the only area in these icons that holds actual "color" is the center, if you ever want to switch the color of your icon, all you need to do is change the values inside this particular layer style.


Step 9

Now the icon is starting to take on the look we’re going for. Here’s what mine looks like to this point.

Step 10

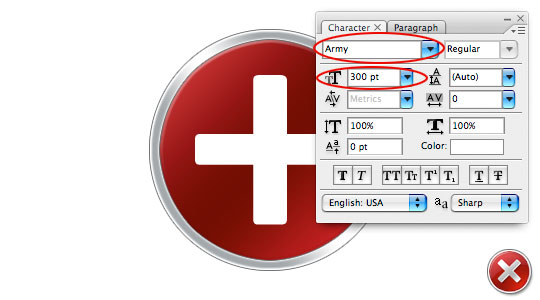
It’s time to add the little X to our error icon. For this you can either find a font that works or you can draw it by hand. The X that microsoft uses is an equal sided one with slightly rounded corners. Since all sides are equal and look more like a plus sign than an actual X I typed a plus sign (+) onto the stage and scrolled through my fonts list until I found one that looked right. In this case the font that worked best for me is called Army and it’s available in the lesson download at the end of the tutorial or you can download it for from at DaFont.com by clicking HERE. I’m using Army Regular with a size of 300 pt.

(*note: If you’re using Mac OSX and try to install this font, your Font Book program may try and tell you there are problems with the font, but it’s actually fine as far as I can tell.)

Step 11

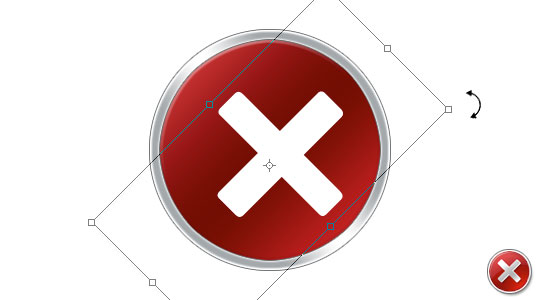
Obviously we need to rotate the plus sign 45° so it looks like an X so lets do that next. Press Command-T (PC: Ctrl-T) to invoke the Free Transform tool, hold the Shift key to constrain the rotation and rotate the selection by holding your mouse over one of the corners until the pointer turns into a little arc with arrows on each end and then clicking and dragging the selection until it’s in the X position. Hit Enter (PC: Return) to commit the transformation when you’re done and center it using the Move tool (keyboard shortcut V) or by using the arrow keys on your keyboard.

Step 12

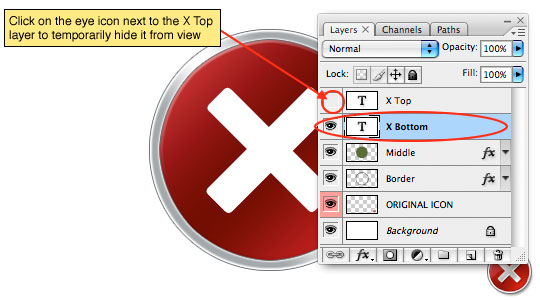
Before we go any further we’re going to need an additional copy of this X layer so press Command-J (PC: Ctrl-J) to duplicate the layer. I’m going to call these two layers X Top and X Bottom respectively.

We’re going to work on the X Bottom layer first, so lets click on it in the Layers palette to select it and lets also click the little eye icon next to the X Top layer to temporarily hide that layer.

Step 13

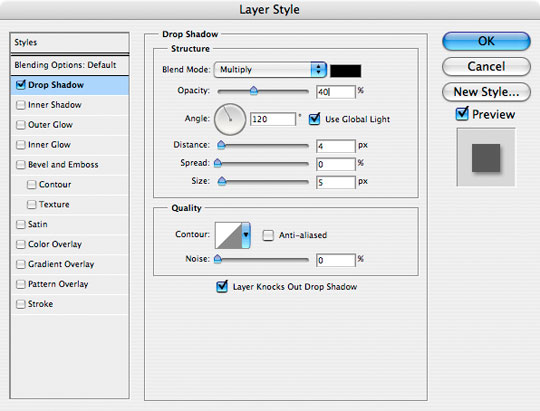
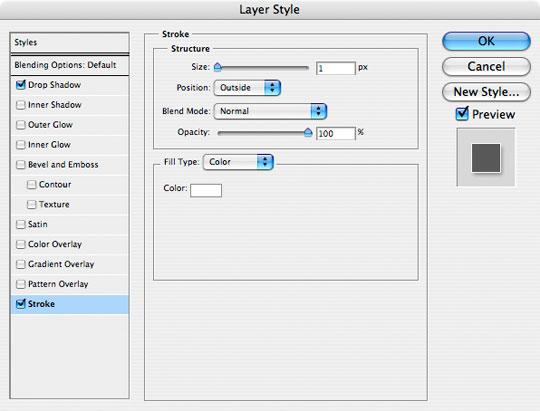
The X Bottom layer is going to be our 3D edge and shadow, so lets add a 1 pixel white Stroke to make this X just a touch bigger than the one above it and a Drop Shadow. Pull up the Layer Styles window for this layer and add the following two styles.


Step 14

Now lets go to work on the X Top layer by clicking on it in the Layers palette and making it visible again by clicking in the empty box to the left of the layer thumbnail in the Layers palette (where the eye icon was before we turned it off).

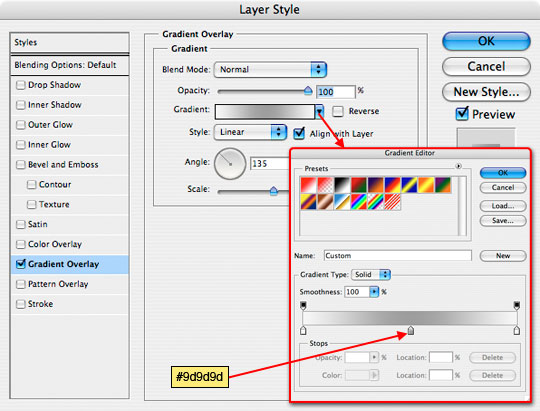
This layer needs the same sort of metallic feel that we gave to the Border layer so lets give it a Layer Styles of it’s own. This one will be easy, just a simple Gradient Overlay

Step 15

The last step to get the X to look just right is to switch to the Move tool by pressing the V key and then simply press the Left Arrow key on your keyboard one time to shift the X Top layer 1 pixel the the left. This will expose a wedge of our X Bottom layer underneath creating a nice little 3D edge effect.

Step 16

The final step in the process will be to add a Web 2.0 style gradient to the icon. In Microsoft’s error icon’s case however the "gradient" isn’t officially a gradient since the effect isn’t heavier at the top than at the bottom, which makes our job here even easier.

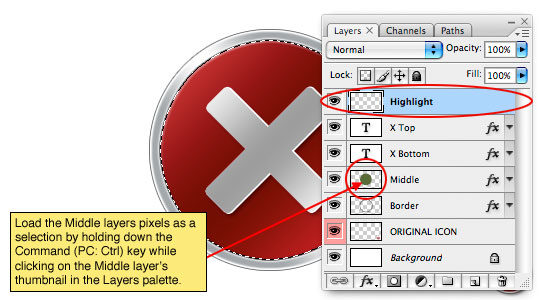
Create a new layer called Highlight above the X Top layer. With the new Highlight layer selected as the working layer hold down the Command (PC: Ctrl) key and click on the layer icon next to the Middle layer to load it as a selection. This will create a nice round selection exactly over the middle area of our icon.

Step 17

Press the D key to reset the foreground and background colors to black and white, then fill the selection with white by pressing Command-Delete (PC: Ctrl-Delete).

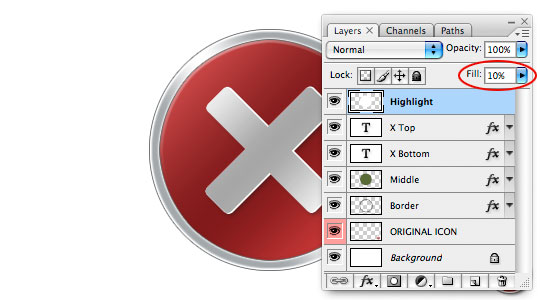
Obviously we can’t have the middle of our icon covered with a solid white blob so lets drop the Highlight layer’s Fill opacity down to about 10%. The effect will now just look like it’s dulled our colors a little bit, but hang on to your hats, we’ve got one more step to go!

Step 18

Last but not least, lets hit the M key to switch back to the Marquee tool. The Elliptical Marquee tool should still be active since it’s what we chose the last time we used the Marquee tool.

Drag out a nice big round selection and position it over the icon as shown below. Press Delete (PC: Backspace) to remove the highlight within the selection area and press Command-D (PC: Ctrl-D) to release the selection. And there’s your Web 2.0 style highlight!

Step 19

Here’s what my icon looks like after Step 18. See, you can do this! Those guys at Microsoft aren’t really that smart after all.

Step 20

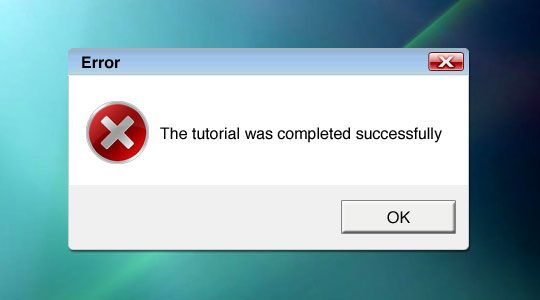
Throw your sexy new icon into a clever little Vista error window and you’ve got a great little effect.

Yes Yes, I did actually include the .PSD for my final image in the tutorial download as well as the Army font and the main tutorial file. Enjoy!

Making Skin Beautiful

Making Skin Beautiful

From Tutiki

(Redirected from Beautiful Skin by Czechman)
Jump to: navigation, search

by Gordon Eyre

Let me start this tutorial by stating the obvious, not everyone has beautiful skin. To compound this problem we have skin eruptions, uneven tan, freckles, unwanted highlights, large pores, etc. In addition, today’s cameras and lenses magnify every imperfection and freeze it for all to see. This tutorial will help the photographer put their models in the best light so to speak. I will start at the point where you have completed your basic processing and have an image with the correct exposure value and white balance.

Overview

This subject will be covered in steps as follows:

  1. Removing or softening major flaws in the skin
  2. Touching up undesired reflections and highlights
  3. Apply a Gaussian blur to the skin to soften and blend it.
  4. Spot sharpening

Note for MAC users: Substitute the Option key for the Alt key when specified in the tutorial.

Removing or softening flaws

There are many ways to remove flaws from the skin; however, I like to use the clone tool. I do not use the clone tool to remove and replace the skin but rather in a special way that will allow me to work slowly to hide the flaw or blemish on the skin. The beautiful young lady pictured here is typical of teenagers in that hormones may cause zits or other eruptions on their skin that are unsightly. As a photographer it is our job to lessen that and make the model look their best. You will note on the neck of this young lady a rather large skin eruption. This is not a normal mark and one that I am sure she wishes were not there.

msb01.jpg

On the tool bar on the left hand side of the workspace is the clone tool. Click on this tool. Now go to the mode setting at the top and select a soft brush that is near to or smaller than the blemish. Move to the right and click on mode, setting it to lighten. Move to the right and set the opacity to around 12% and the flow rate to 100% or less. You are now ready to begin hiding the blemish. Find a good patch of skin near the blemish, position your brush on it, hold down the ALT key and click your mouse once. Now begin to soften the blemish by doing a click and hold while going over and over the blemish. You will note that it begins to lighten. Continue until the blemish is gone. In the center of the blemish it is lighter than the surrounding skin. Set mode to darken, ALT click on the good skin and repeat the process above to darken this lighter area. The blemish is now gone as shown in the image. You might also note that I have lightened some of her permanent moles and fixed other light or dark areas using the same technique described above. I generally do not totally remove permanent moles on a models face.

msb02.jpg


Touching up undesirable highlights and reflections

The end of nose is a particularly onerous place for reflections and burned out highlights as you will note on the model above. Removing them is just as simple as removing a blemish. The difference is that you set the clone tool mode to darken. Select a patch of skin with the appropriate color and do an ALT click. Now go over the highlight until it looks good to you. Be careful not to go too far a field from the highlight itself as you can make the nose look flat in that area instead of rounded as it normally is. If you make a mistake, it is simple to go back a step in the history palette and redo that step. Don’t hesitate to switch between darken and lighten if need be. At this stage do not worry if everything is not perfect as the Gaussian blur will take care of minor imperfections in your work.

msb03.jpg


Apply a Gaussian blur to the skin to soften and blend it

Much of the information in this part of the tutorial was gleaned from Scott Kelby’s great book entitled The Photoshop Book for Digital Photographers, which I recommend highly to everyone new to Photoshop.

I will attempt to keep the "how to" part of this tutorial as detailed as possible so that those new to Photoshop will be able to follow along. This is an advanced technique so stay with me. First thing to do is to open the picture that you want to apply the Gaussian blur to. Create 2 additional layers of this image in the Layer’s pallet. An easy way to do this is to hold down the Ctrl key and click on the J key twice. You should now see three layers of the image. Hide layer 1 copy by clicking on the Eye icon next to it in the layers pallet. Highlight the middle layer by clicking on it and your layers pallet should now look like this:

msb04.jpg

In the drop down box on the Layer’s pallet change the blend mode from Normal to Darken. Next go to the menu at the top of the screen and click filter/blur/Gaussian blur and then apply a 35 pixel blur to the image. Don’t worry that your image looks bad at this stage.

msb05.jpg

On the Layers pallet, click on the little Eye icon beside the middle layer to hide this layer and then click on the top layer to make it active. Now change the blend mode from Darken to Lighten by clicking on Lighten in the drop down box. Next run a 50 pixel blur on this top layer (Filter/blur/Gaussian Blur).

msb06.jpg

After you have applied the blur, click on the middle layer to make it the active layer and then lower the opacity to 30%. Hide the background layer from view by clicking on the Eye icon beside it and then create a new layer by clicking on the New Layer Icon at the bottom of the Layers pallet. This icon is on the bottom right just next to the little garbage can. When the new layer is created click and drag this layer to the top of the stack as shown.

msb07.jpg

Next, hold down the Alt Key and with your mouse go to the top and click (hold) on Layers and while holding the mouse button down go to the bottom and release the mouse button over Merge Visible as shown here.

msb08.jpg

This creates a flattened version of your document in the new layer. In the layers pallet, make the background layer visible with the Eye icon and hide the two middle layers by removing the Eye icon from them. Make sure the top layer is the active layer and then lower the opacity to 37%. This is a subjective adjustment and you should set it at the point that your image has the right amount of blur to suit your taste. All that is left now is the removal of the Gaussian blur from the hair, eyes, eyebrows, lips, jewelry, clothing and anything else that you don’t want blurred.

Click on the layer mask icon at the bottom of the layer pallet (third from the left). Insure that your foreground color is set to black. You can change the background/foreground easily by clicking on the small x while watching it change on the leftmost tool pallet. Select a soft edged brush from the tool pallet and paint over everything that you do not want blur on (eyes, mouth, hair, etc.). Generally this is everything except the skin. Change the size of the brush so that it is easy for you to do that without getting over into the skin. Your layers pallet will now look like this.

msb09.jpg

At this point you may flatten the layers and discard the unused layers (Layers/Flatten Image). If you feel a little touch up for the brightness of the image is needed, do that with levels or Brightness/Contrast.


Spot Sharpening

Select the spot sharpener from the tool pallet on the left hand side of your screen and quickly go over the eyes, mouth, and anything else that you want sharpened.

Applying a final sharpening is up to you but in any event do not over sharpen. Watch the eyelashes and hair especially so as not to create artifacts or halo's. Here is the final product:

msb10.jpg

Don't be intimidated by this tutorial, once you run through it a few times it is quite easy. One last caution, it is better to error on the side of too little blur than too much. It is easy to make the skin look plastic and unnatural. The goal is to accomplish the softening but yet not have it noticed. If you remove all traces of texture to the skin you will have failed for most types of portraits.

Sunday, April 5, 2009

Adobe Photoshop CS4 Keyboard Shortcut


Adobe Photoshop CS4 Keyboard Shortcut


Tools File Alt+F Edit Alt+E
C
Assign Profile Ctrl+Alt+Shift+ [
Add mode (Shape tools) + Browse (launch Adobe Bridge) Ctrl+Alt+O
C
Convert to Profile Ctrl+Alt+Shift+ ]
Subtract mode (Shape tools) Close Ctrl+W / Ctrl+F4
-
Lock transparency pixels (on / off) / Close All Ctrl+Alt+W / Ctrl+Shift+F4 Clear (selection) Delete / Backspace
Decrease brush size [ Close and Go To Bridge Ctrl+Shift+W Color Settings Ctrl+Shift+K
Increase brush size ] Exit Ctrl+Q Copy Ctrl+C
Decrease brush hardness by 25% Shift+ [ File Info Ctrl+Alt+Shift+ I Copy Merged Ctrl+Shift+C
Increase brush hardness by 25% Shift+ ] New Document Ctrl+N Cut Ctrl+X
Previous brush , New Document (last settings) Ctrl+Alt+N Fade (last filter / adjustment) Ctrl+Shift+F
Next brush . Open Ctrl+O Fill (show dialog) Shift+Backspace
First brush Shift+ , Open As Ctrl+Alt+Shift+O Fill from history Ctrl+Alt+Backspace
Last brush Shift+ . Page Setup Ctrl+Shift+P Fill from history & preserve trans. Ctrl+Alt+Shift+Back
C
Place Ctrl+Shift+O Fill w/ background & preserve trans. Ctrl+Shift+Backspa
Tool opacity 10% ® 100%
1 0
Print Ctrl+P Fill w/ foreground & preserve trans. Alt+Shift+Backspac
Flow 10% 100% Shift+1 0
Path / Direct Selection tools A Print One Copy Ctrl+Alt+Shift+P Fill with background color Ctrl+Backspace
Brush / Pencil / Color Replacement tools B Revert F12 Fill with foreground color Alt+Backspace
N
Crop / Slice / Slice Selection tools C Save Ctrl+S Free Transform Ctrl+T
Default Foreground and Background Colors D Save As Ctrl+Shift+S Free Transform with duplicate Ctrl+Alt+T
Eraser / Background Eraser / Magic Eraser E Save As Copy Ctrl+Alt+S Keyboard Shortcuts Alt+Shift+Ctrl+K
Gradient / Paint Bucket tools G Save for Web & Devices Ctrl+Alt+Shift+S Menus Ctrl+Alt+Shift+M
N
Hand tool (bird's eye view) H Paste Ctrl+V
N
Eyedropper / Sampler / Ruler / Note / Count I Select Alt+S Paste Into (selection) Ctrl+Shift+V
Spot Healing / Healing / Patch / Red Eye J All Ctrl+A Paste Outside (selection) Ctrl+Alt+Shift+V
NE
3D Rotate / Roll / Pan / Slide / Scale tools K All Layers Ctrl+Alt+A Preferences (General) Ctrl+K
C
Contract Ctrl+Alt+ [ Preferences (last used) Ctrl+Alt+K
Lasso / Polygonal Lasso / Magnetic Lasso L
C
Purge All Ctrl+Shift+ '
Rectangular / Elliptical Marquee tools M Deselect Ctrl+D
NE C
3D Orbit tools (Roll View / Pan View / etc.) N Edit in Quick Mask Mode (on / off) Q Purge All (no dialog) Ctrl+Alt+Shift+ '
C
Expand Ctrl+Alt+ ] Step Backward (history) Ctrl+Alt+Z
Dodge / Burn / Sponge tools O
C
Feather Ctrl+Alt+D Step Forward (history) Ctrl+Shift+Z
Pen / Freeform Pen tools P
Edit in Quick Mask Mode (on / off) Q Inverse Ctrl+Shift+ I Transform Again Ctrl+Shift+T
N
Rotate View tool R Move duplicate of selection 1 px Transform Again with duplicate Ctrl+Alt+Shift+T
Ctrl+Alt+ , , ,
Clone / Pattern Stamp tools S Move duplicate of selection 10 px Undo / Redo Ctrl+Z
Ctrl+Alt+Shift+ , , ,
Type tools (Horiz / Vert / Horiz Mask / Vert Mask) T Move selection 1 px
Ctrl+ , , ,
Shape tools (Rect / Round Rect / Ellipse / etc.) U Move selection 10 px Layer Alt+L
Ctrl+Shift+ , , ,
Move tool V Nudge selection outline 1 px Add-select layers to bottom layer Alt+Shift+ , , , ,
Quick Selection / Magic Wand tools W Nudge selection outline 10 px Add-select layers to top layer Alt+Shift+ .
Shift+ , , ,
Switch Foreground and Background Colors X Refine Edge Ctrl+Alt+R Add-select next layer Alt+Shift+ ]
History / Art History Brush tools Y Reposition selection outline Space-drag Add-select previous layer Alt+Shift+ [
C
Zoom tool Z Reselect Ctrl+Shift+D
Blending Options Ctrl+Alt+ /
Hand tool (toggle) Space Bring Forward Ctrl+ ]
Zoom In (toggle) Ctrl+Space Filter Alt+T Bring to Front Ctrl+Shift+ ]
C C
Add Noise Ctrl+Alt+Shift+Z Convert to Smart Object Ctrl+Alt+Shift+D
Zoom Out (toggle) Alt+Space
C
Gaussian Blur Ctrl+Alt+Shift+G Create / Release Clipping Mask Ctrl+Alt+G
Cycle Path / Direct Selection tools Shift+A
Cycle Brush / Pencil / Color Replacement tools Shift+B Last filter (reapply) Ctrl+F Delete Layers (Groups) Backspace / Delete
N C
Cycle Crop / Slice / Slice Selection tools Shift+C Last filter (show dialog) Ctrl+Alt+F Duplicate Layers (Groups) Ctrl+Shift+ /
C C
Lens Correction Ctrl+Alt+Shift+Y Duplicate Layers (Groups) (no dialog) Ctrl+Alt+Shift+ /
Cycle Eraser tools Shift+E
C
Flatten Image Ctrl+Alt+Shift+F
Cycle Gradient / Paint Bucket tools Shift+G Liquify Ctrl+Shift+X
N C
Cycle Eyedropper / Sampler / Ruler / Note / Count Shift+ I Smart Sharpen Ctrl+Alt+Shift+W Group Layers Ctrl+G
C C
Unsharp Mask Ctrl+Alt+Shift+U Layer (Group) Properties F2 / Ctrl+ /
Cycle Spot / Healing / Patch / Red Eye tools Shift+J
NE
Cycle 3D Rotate / Roll / Pan / Slide / Scale Shift+K Vanishing Point Ctrl+Alt+V
Layer opacity 10% 100% 1 0
Cycle Lasso tools Shift+L Merge Layers Ctrl+E
Cycle Rectangular / Elliptical Marquee tools Shift+M Merge Visible Ctrl+Shift+E
NE
Cycle 3D Orbit tools (Roll View / Pan View / etc.) Shift+N Channels New Layer Ctrl+Shift+N
Cycle Dodge / Burn / Sponge tools Shift+O Add composite selection Ctrl+Alt+Shift+2 New Layer (no dialog) Ctrl+Alt+Shift+N
Cycle Pen / Freeform Pen tools Shift+P Add layer mask selection Ctrl+Alt+Shift+ \ New Layer via Copy Ctrl+J
Cycle Clone / Pattern Stamp tools Shift+S New Layer via Copy (show dialog) Ctrl+Alt+J
Add selection channel 1 7 Ctrl+Alt+Shift+3 9
Cycle Type tools Shift+T Alpha / composite channel (toggle) ` New Layer via Cut Ctrl+Shift+J
Cycle Shape tools (Rect / Round Rect / etc.) Shift+U Layer mask as rubylith (on / off) \ New Layer via Cut (show dialog) Ctrl+Alt+Shift+J
N
Load composite as selection Ctrl+Alt+2 Select bottom layer Alt+ ,
Cycle Quick Selection / Magic Wand tools Shift+W
Cycle History / Art History Brush tools Shift+Y Load layer mask as selection Ctrl+Alt+ \ Select next layer Alt+ ]
N
Airbrush (with Brush tools selected) Alt+Shift+P
Select previous layer Alt+ [
Load selection channel 1 7 Ctrl+Alt+3 9
N
Select top layer Alt+ .
Select channel 1 7 Ctrl+3 9
Miscellaneous Select composite channel Ctrl+2 Send Backward Ctrl+ [
Accept operation Enter Select layer mask (channel) Ctrl+ \ Send to Back Ctrl+Shift+ [
Esc / Ctrl+ . Stamp Down Ctrl+Alt+E
Cancel operation
E
Analysis Alt+A Stamp Visible Ctrl+Alt+Shift+E
Apply zoom and keep zoom field active Shift+Enter
C NE
Play action Ctrl+Alt+ . Record Measurements Ctrl+Shift+M Ungroup Layers Ctrl+Shift+G

Entireweb